
NomadBSD Handbooklet
Content
- Intro
- Installation
- The NomadBSD setup
- Overview
- Key bindings
- Adding applications to the plank panel
- Display manager settings: Auto login, default user, and theme
- Adding a preconfigured user account
- Filesystem
- Networking
- Installing software packages
- Installing Linux® browsers for watching Netflix, Prime Video, etc.
- Sound
- Using an alternative window manager
- Advanced Topics
- Troubleshooting
Intro
NomadBSD is a 64bit live system for USB flash drives, based on FreeBSD®. Together with automatic hardware detection and setup, it is configured to be used as a desktop system that works out of the box, but can also be used for data recovery, for educational purposes, or to test FreeBSD®'s hardware compatibility.
Installation
Choosing a USB flash drive
NomadBSD performs well on USB 2.X flash drives, but writing many small files can be very slow. To improve performance, you should consider using a USB 3.X flash drive even on a USB 2.X port, as they tend to be faster. See USB 3.0 Flash Drive Roundup. Do not use cheap no-name thumb drives they sell at super markets and drug stores. These drives are very slow and unreliable.
Downloading and writing the image
Instructions for writing the image to a flash drive from different operating systems can be found here.
The NomadBSD setup
When you boot NomadBSD for the first time, it will run the setup wizard which
allows you to set your locale, timezone, keyboard settings, password,
encryption, and default applications. The setup of the UFS version creates a
new partition for the /data directory which uses the remaining space on the
storage device. Depending on the size, creating the file system can take
several minutes. The setup of the ZFS version expands the pool to the
remaining space of the storage device.
Overview
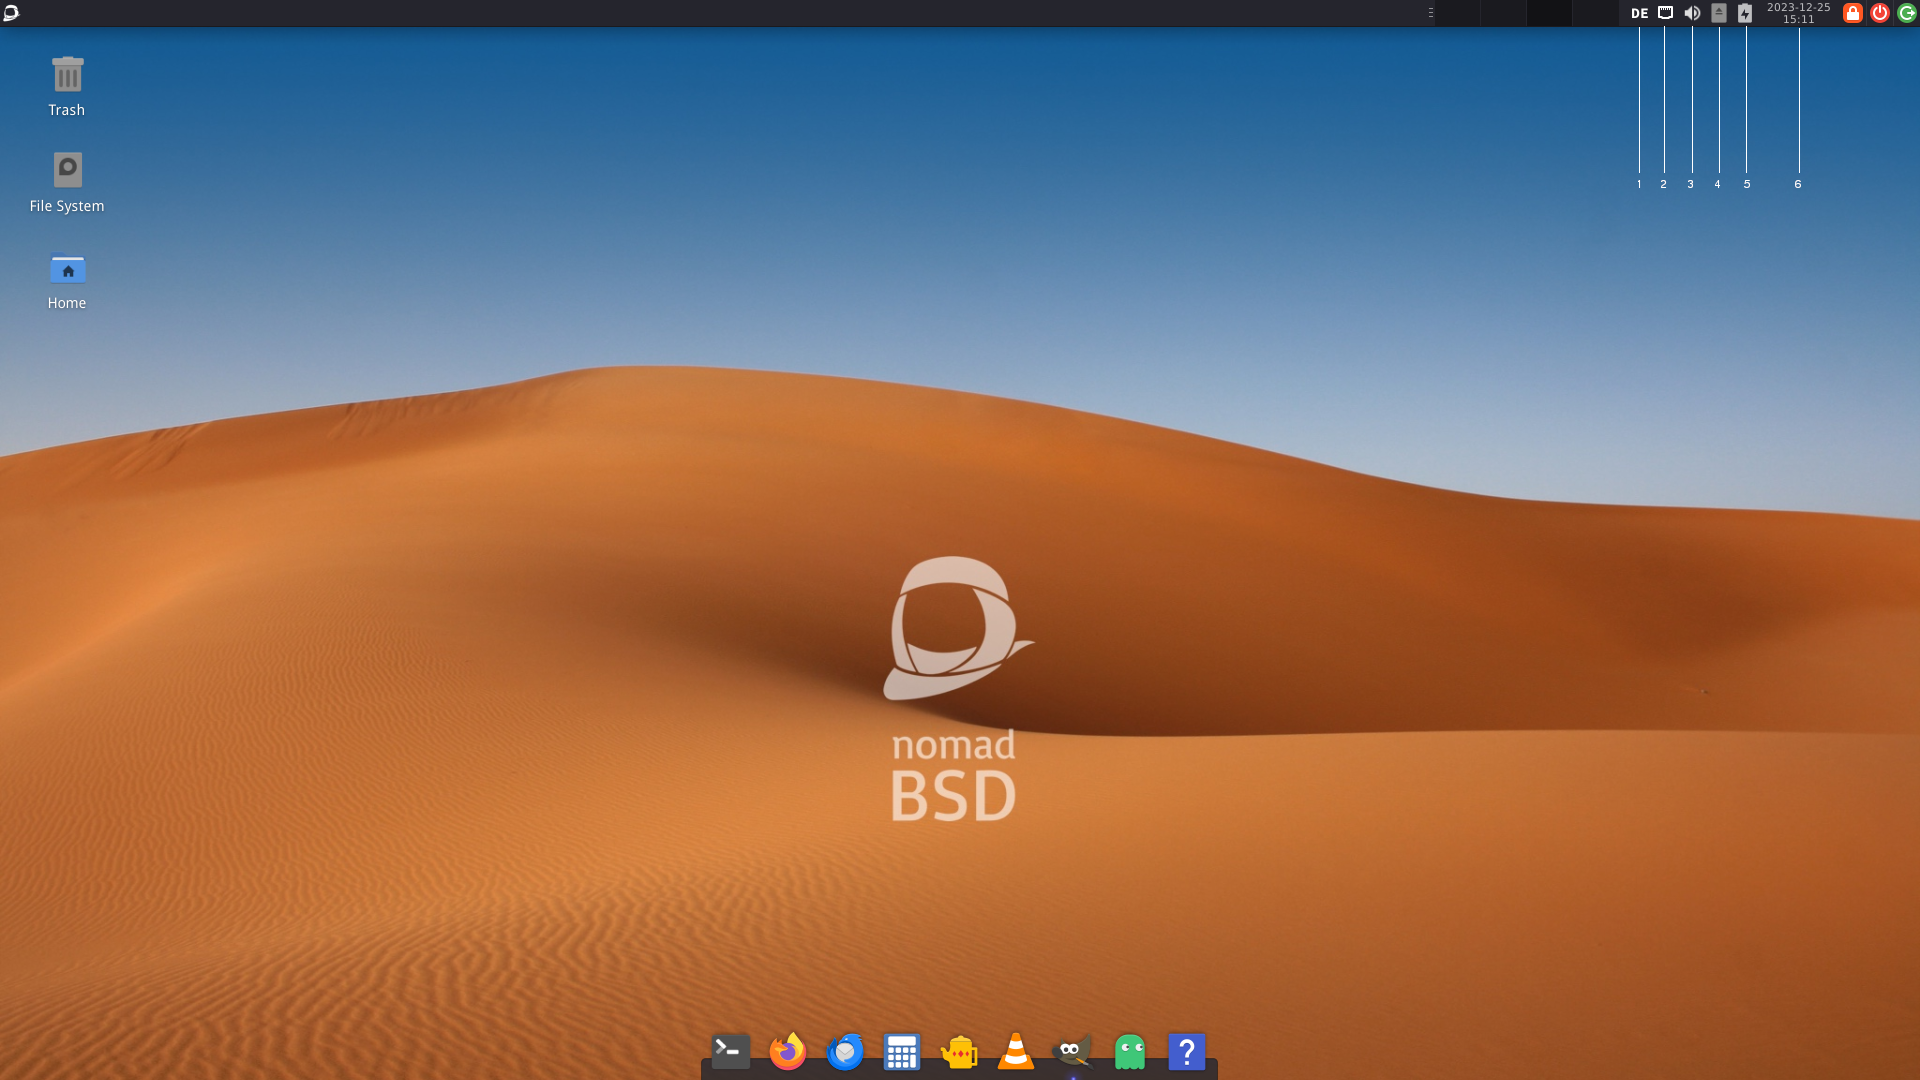
Keyboard Layout Settings. Left-Clicking on the icon opens a menu to switch between keyboard layouts. Right-Clicking opens the menu for settings.
NetworkMgr. Clicking on the icon shows the menu from which you can connect to wireless networks.
DSBMixer. By hovering over the icon you can see the current volume of the master channel. Using the mouse wheel on it lets you change the master volume. Clicking on it brings up the main window of DSBMixer.
DSBMC. Clicking on the icon brings up the main window in which you can see all the mountable storage devices attached to the system. Use the context menu of the device icons to select an action (un/mounting, opening, playing, ejecting) or double click to mount and open the device in your default file manager. You can use the preferences menu to change the file manager, autoplay setting, and multimedia programs.
Battery monitor.
Date and time. Clicking in that area brings up a calendar.
Key bindings
Global keybindings
| Keys | Function |
|---|---|
| Alt+F2 | Open DSBExec to execute a command. |
| Ctrl+Alt+L | Lock the screen. |
| Open XFCE 4 screenshooter. |
Terminal keybindings
| Keys | Function |
|---|---|
| Ctrl++ | Increase font size |
| Ctrl+- | Decrease font size |
| Shift+Ctrl+C | Copy selected text |
| Shift+Ctrl+V | Paste copied text |
| Ctrl+Shift+T | Open a new tab |
| Ctrl+Shift+W | Close current tab |
| Alt+Left cursor | Previous tab |
| Alt+Right cursor | Next tab |
| Alt+[1-9] | Switch to tab N (1-9) |
| Ctrl+Shift+S | Toggle scrollbar |
| Ctrl+Shift+Left mouse button | Open link |
| F11 | Fullscreen |
| Shift+PageUp | Scroll up one page |
| Shift+PageDown | Scroll down on page |
| Ctrl+Shift+Up | Scroll up one line |
| Ctrl+Shift+Down | Scroll down one line |
IBus keybindings
| Keys | Function |
|---|---|
| Ctrl+Super+period | Lets you insert an emoji at the current cursor position by typing its annotation followed by space. Hitting space without annotation text will open the emoji menu. This feature is broken in ibus-1.5.27_2 |
| Ctrl+Super+space | Switch input method. |
| Ctrl+Shift+u | Insert a unicode character at the current cursor position by entering its code. |
Adding applications to the plank panel
Open your preferred graphical file manager, and navigate to /usr/local/share/applications.
You can also get there by clicking the shortcut Applications on the side pane.
Use Drag&Drop to add application icons to the plank panel.
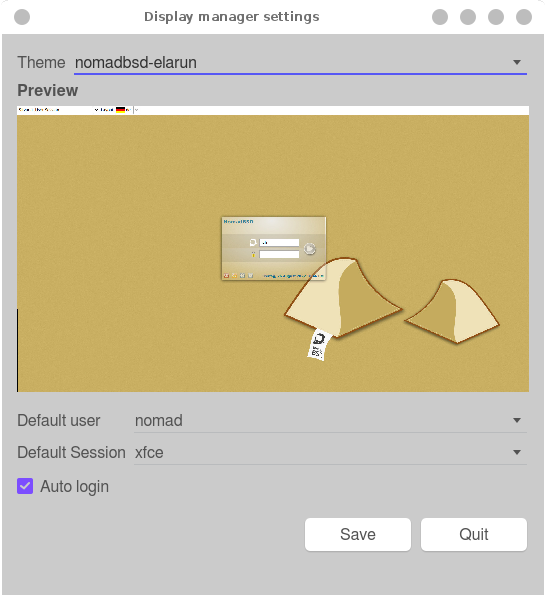
Display manager settings: Auto login, default user, and theme
The display manager, SDDM, used by NomadBSD is configured to automatically log in the default user nomad. The program nomadbsd-dmconfig (main menu → Settings Manager → Display manager settings) allows you to change/disable the default user, select the default session, and to enable/disable auto login. Furthermore, it lets you change the theme. If you want to add a new theme, copy the theme's directory to /usr/local/share/sddm/themes/. To see a preview in nomadbsd-dmconfig copy a screenshot of the login screen to /usr/local/share/sddm/themes/your-theme-name/your-theme-name.jpg.
Adding a preconfigured user account
If you want to add a further preconfigured user account use nomadbsd-adduser (main menu → Settings Manager → Add user). Since NomadBSD is configured to automatically log in the user nomad you need to change that behaviour in order to be able to log in as another user. See nomadbsd-dmconfig.
Filesystems
NomadBSD comes with a bunch of pre-installed filesystems (CD9660, FAT, HFS+, NTFS, Ext2/3/4). You can mount storage devices via DSBMC (see Overview), which is a graphical client for DSBMD.
Automount
You can enable automount in DSBMC under File → Preferences → Automatically mount devices
Alternatively, you can use dsbmc-cli:
Execute the command dsbmc-cli -a to automount all currently connected
storage devices, and to enable automounting on devices attached later to the
system. To start this command automatically on session start, open
DSBAutostart, and add a new entry for the above command.
Extending filesystem support
The following subsections describe how to extend the filesystems support. Rebooting the system, or restarting DSBMD is not necessary.
ExFat
Unfortunately, sysutils/fusefs-exfat requires a license from Microsoft®, and so it can't be pre-installed. You have to build it yourself by using the ports:
# pkg install autoconf automake
# svnlite co https://svn.freebsd.org/ports/head/Mk /usr/ports/Mk
# svnlite co https://svn.freebsd.org/ports/head/Templates /usr/ports/Templates
# svnlite co https://svn.freebsd.org/ports/head/sysutils/fusefs-exfat /tmp/fusefs-exfat
# cd /tmp/fusefs-exfat
# make DISTDIR=/tmp install
or the Git repo:
# pkg install autoconf automake
# git clone https://github.com/relan/exfat.git
# cd exfat
# autoreconf --install
# ./configure
# make && make install
BTRFS and XFS
Install the package fusefs-lkl for BTRFS and XFS support.
# pkg install fusefs-lkl
Networking
Wireless Networking
The program networkmgr, which runs in the tray, allows you to connect to wireless networks.
Installing software packages
You can install and upgrade software packages with OctoPkg (main menu → System → OctoPkg) which is a graphical front-end to FreeBSD's pkg.
Installing Linux® browsers for watching Netflix, Prime Video, etc.
The program lbi-gui (main menu → Network → Linux Browser Installer GUI) allows you to install Widevine capable Linux browsers.
Sound
Selecting the default audio device
Right-click on the speaker/volume indicator icon in the panel, and choose Preferences from the menu. In the preferences window go to the Default device tab, select the sound card/device, and click on Ok. In order to take effect make sure to restart your audio application(s).
Using an alternative window manager
You can install different window managers and desktop environments on NomadBSD. Select the one you want to start by selecting from the sessions menu at the graphical login manager (SDDM).
Advanced Topics
Resetting NomadBSD (UFS version only)
If you are a tester, or your experiments with the systems left a total mess, you might want to reset NomadBSD.
Warning: The reset will delete /home, /private, /etc,
/var, /root, and /usr.local.etc. Make a backup if there are any files
you want to keep.
You can reset NomadBSD as follows:
- Boot into single-user mode by (re)booting and choosing
2in the boot menu. - Execute
/usr/libexec/nomadbsd-reset
After rebooting you'll be greeted by the setup again.
Limitations
If you have modified or deleted system files from directory trees other than
/home, /private, /etc, /var, /root, /tmp, and /usr.local.etc,
you might not be able to cleanly reset NomadBSD.
Disabling the automatic graphics driver setup
If you want to create your own graphics driver settings, you can disable
initgfx by adding
initgfx_enable="NO" to /etc/rc.conf.
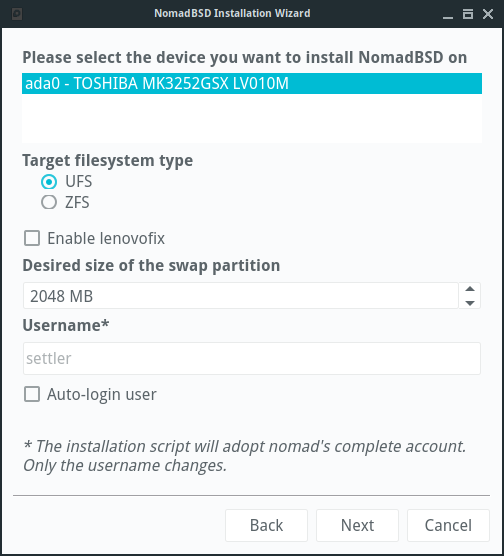
Installing NomadBSD on a hard disk
Start main menu → System → NomadBSD Installer and follow the instructions.
Note: The NomadBSD installer will use the entire disk. Installing to a single partition is currently not possible.
Running NomadBSD in Virtualbox™
- Download and extract an image you intend to run.
Create a virtual harddisk (VDI) from the image:
VBoxManage convertfromraw nomadbsd-x.y.z.img \
    nomadbsd-x.y.z.vdi --format VDI
Change the size of the virtual harddisk, so that you have enough space to store files, and install packages. NomadBSD's base system requires approx. 4 GB, so resizing the VDI to 8 GB (8000 MB), which is the minimum recommended size, will give you about 4 GB for your files.
VBoxManage modifyhd nomadbsd-x.y.z.vdi --resize 8000
Note: Increasing the size of the VDI after running the NomadBSD setup will not have any effect on NomadBSD's filesystem capacity.
Start VirtualBox™, and create a new virtual machine. Select Use an existing virtual hard disk file in the Hard disk settings, and choose nomadbsd-x.y.z.vdi which we created in 2.
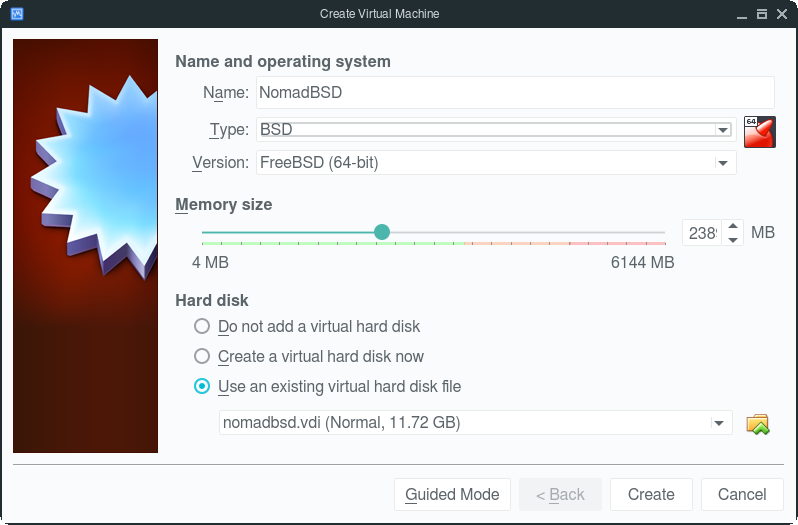
Go to Settings → Display and set the video memory to 128MB or more.
- Go to Settings → System → Processor and set the number of processors to 2.
Installing Linux® packages
Before you can install Linux® packages it is necessary to enable Linux® binary compatibility. Let's say you want to install linux-sublime you can proceed as follows:
# sysrc linux_enable=YES
# service abi start
# pkg install linux-sublime
Troubleshooting
Errata
If you experience any problems, consult the NomadBSD Errata first.
Boot problems
The boot process stops at the mountroot prompt
If you are using a USB 3.X port, try to use a USB 2.X port instead.
Graphics
Automatic graphics card detection crashes the system
If the graphics driver detection crashes the system, you can use a non-accelerated fallback driver (VESA or SCFB) by disabling the automatic detection in the boot menu:
- (Re)boot and enter the boot submenu
Boot Options(7). - Change
Disable automatic Graphics detectiontoOnby pressing the key matching the item number. - Go back to main menu, and press
<Enter>to boot.
ATI/AMD
If you are booting a system with ATI/AMD graphics via UEFI, you might experience some problems. Due to a conflict with the EFI framebuffer, NomadBSD might crash or hang when the graphics driver gets loaded, or it just isn't able to start the X window system.
Try the following workaround:
- (Re)boot and enter the boot submenu
Boot Options(7). - Change
Disable sysconstoOnby pressing the key matching the item number. - Go back to main menu, and press
<Enter>to boot.
Note: You won't see any boot messages until the graphics driver gets loaded.
NVIDIA
If you see an error message like device_attach: nvidia0 attach returned 6
you could try to add debug.acpi.disabled="sysres" to /boot/loader.conf.
Distorted/squished EFI framebuffer screen
If you happened to see that the screen content seems to be squished into the upper 1/3 of your monitor you can try the following:
- Reboot, and then enter the loader prompt by pressing
3at the boot menu. - Type:
gop set 0
boot
If that didn't solve the problem, enter the loader prompt as described above,
and type list gop to see a list of supported modes. According to the list
try another mode number for the gop set command in 2.). If you found a mode
that resolves the problem, you can save that setting by adding the line
exec="gop set X" to /boot/loader.conf, where X is the mode number.
Another way to solve this problem is to boot your system in legacy mode. Consult your EFI/BIOS manual.
Hybrid Combination/Switchable Graphics
NomadBSD doesn't support switchable graphics like Optimus yet. If the Xorg server fails to start, disable one of the GPUs in your system's BIOS/UEFI.